
Since a while I am experimenting with docker, setting up my own docker development environment, experimenting with containerizing apps and trying out kubernetes. It’s easy to get started with docker which makes it so much fun to play around with it. But as I said before I also like to know how things work. That’s why I got interested in the fundamentals of containers and tried to build my own without the use of docker but only with the help of the linux kernel.
Hypervisors
Before I start building my own containers let me start with explaining the difference between virtual machines and containers.
Virtual machines run on a hypervisor. Simply said an hypervisor is a virtual machine manager. It’s software or hardware that can create and run virtual machines. The machine on which the hypervisor runs is called the host machine and the virtual machine itself is called the guest machine.
Basically there are two types of hypervisors. Native (type 1) and hosted (type 2) hypervisors.
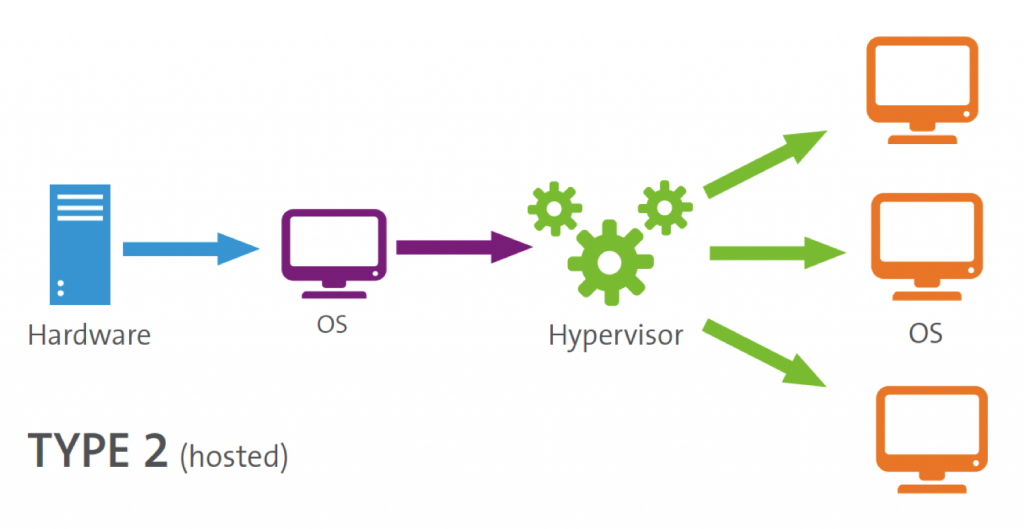
A type 2 hypervisor is a computer program running on an operating system like Windows or Linux. These type of hypervisors run like any other application and use the host hardware drivers to communicate with the underlying hardware. The advantage is that they are easy to install and run almost any hardware configuration. The disadvantage is that it’s less efficient than a type 1 because there is an extra layer, the host OS.
Source: Flexiant
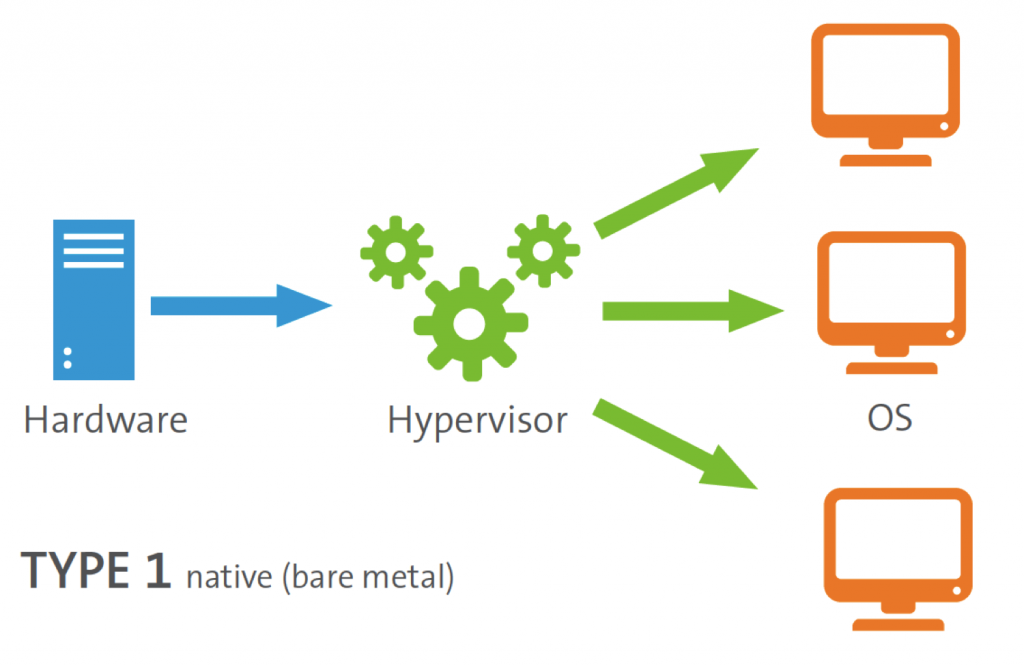
Type 1 hypervisors run directly on the hardware. They don’t need a host OS. Therefore they are much more efficient and use much less resources. But they are more restricted, they can’t run on every type of hardware. That is because the hypervisor has to talk to the hardware directly.
You will see that the most important difference between hypervisors and containers is that hypervisors virtualize the underlying hardware making it possible to run almost any OS on top of your host OS. Containers only isolate processes therefor they are much more limited by the host OS possibilities.
Containers
Most people immediately think about Docker when they read about containers. But containers exist already a long time before docker existed. In 2000 containers were already used in FreeBSD jail. Just like virtual machines, with container you can create an isolated environment. But in contradiction to virtual machines, containers share the underlying host kernel and have therefore less overhead. This means containers are much more light weighted, you can run approximately 6 to 8 times more containers then virtual machines on the same hardware. Most importantly they are fully transparent to the underlying OS. Meaning the OS can see all processes in your container but not the other way around. In contrary to virtual machines, which are a black box for the host OS. The possibilities of a container are strongly dependent on the underlying host kernel API. Therefore it’s not possible to run other operating systems (kernels) inside a container. This is also a huge difference between containers and virtual machines. Beside linux containers also Windows containers exist. But they are far less mature and popular then linux containers and therefore I will not discuss them today.
So what is a container exactly and how can we create one ourselves without using docker. First let’s dive a bit deeper in the linux kernel to explain what a container exactly is.
Linux Kernel API
The linux kernel API has some really cool features that can help you isolate processes. The most import two are namespaces and cgroups.
Namespaces
Namespaces work a bit like you are used to in a programming language. All processes using the same namespace can see each other but processes outside that namespace are invisible. So let’s say process X runs in namespace A and process Y runs in namespace B then both processes are totally unaware of each other. Some very well-known namespaces are:
- MNT
- PID
- NET
- UTS
- USER
By default all processes run in the global namespace. So by default they can see all other processes (global PID namespace) and see all users (global USER namespace) and see all network devices (global NET namespace) and see all directories and files (global MNT namespace). Moving such process to there own namespace isolates it from the rest of the OS. We will see how this works in a moment.
CGroups
Namespaces are not enough to make a process truly isolated. You also need cgroups. Cgroups controls resource usage. Let’s say you have a process completed isolated using namespaces. It can’t see any other processes, users etc anymore. This process can still influence other OS processes invisible to this process by using a lot of system resources like CPU or memory. Because if it uses to much memory it can be responsible for killing other processes which it is unaware of. Therefore it’s not truly isolated yet. With cgroups you can fix this. You can put the process in his own cgroup so that even resource usage is isolated.
Let’s play!
Let me demonstrate the power of namespaces. If you are on a windows machine you have to create a linux virtual machine. But even if you have a linux machine I recommend doing this in a virtual machine because you are playing with fire, whoehaha!
Open a terminal and let’s start playing. First let’s check the linux kernel version:
|
1 |
uname -a |
Next let’s get a list of all available namespaces:
|
1 |
ls -l /proc/self/ns |
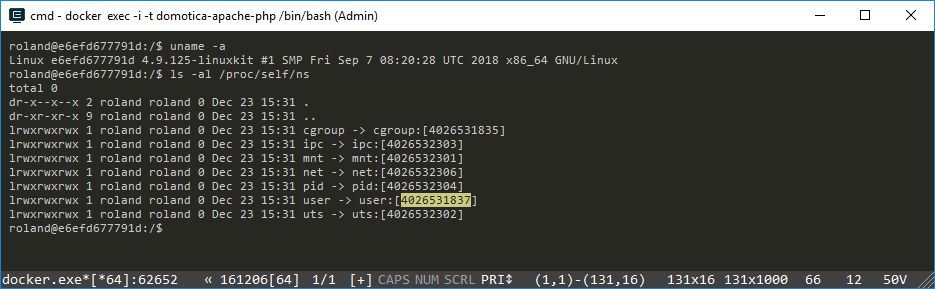
Notice in the above screenshot the numbers behind the namespaces. These numbers identify the current namespace of the current process. Our terminal is the current process. Now let’s find out who we are by typing:
|
1 |
id |
Probably you get something that looks like this:
uid=1000(roland) gid=1000(roland) groups=1000(roland)
Now we are going to do some magic. I am not the root user to this system. But I will trick the terminal process in becoming the root user. Do you feel the power! Type in the following:
|
1 |
unshare -r -u |
OMG! You are root now! Check the screenshot below:

Notice the namespace ID’s behind the user namespace. The unshare command creates a new namespace and puts the current terminal process in that new namespace. Because there are no user yet in this namespace you become automatically the root user in this new namespace. Lucky for us this is not a real root user. Meaning it’s the real root for this namespace but all other processes are in a different user namespace and will not see our user as a root user. Therefore it’s a root user without root powers ;-).
|
1 |
cat /proc/self/uid_map |
This command outputs something like this:
0 1000 1
What we see here is a confirmation that we are not really root. Our root user is in the real world user with ID 1000. And user 1000 that’s me Roland!
Now let’s also play with cgroups. Open your terminal and type in:
|
1 2 3 |
echo $$ cd /sys/fs/cgroup ls -al |
This will output the current process ID and list all available cgroups. To demonstrate how cgroups work I will use the most simplistic cgroup of them all, the freezer. This simple control group can freezes processes. Now goto the freezer directory and type in:
|
1 2 |
cd freezer cat tasks |
This will output a list of all running processes on your machine. What we can do now is change the state of the freezer to FROZEN. This will freeze all processes, including your terminal process. Therefore don’t do this, you will not be able to reset it when you terminal is frozen! Instead let’s create a new control group simply by creating a directory inside this cgroup
|
1 2 3 4 |
mkdir test cd test ls -al cat tasks |
Notice that you can only create a new cgroup as root. If you are still the fake root user as above you will see that you don’t have real root powers ;-). After you created the new directory ‘test’ notice that the directory is immediately filled with files like tasks. Tasks is empty for now. Now put your current process ID in this tasks file:
|
1 |
echo $$ > tasks |
Now you created an isolated cgroup for this terminal process. Next open a new terminal (it’s a new process). Use echo $$ to verify it’s a new process. In this terminal goto the above test directory and use this command:
|
1 2 3 |
cd /sys/fs/cgroup/freezer/test cat freezer.state echo FROZEN > freezer.state |
Notice that you can still type in this terminal but that the other terminal is frozen now (not responding). Now unfreeze it by the following command:
|
1 2 |
cat freezer.state echo THAWED > freezer.state |
This is how you can use cgroups to isolate processes. Very cool isn’t it!
Summary
From a conceptual perspective containers consist of namespaces and cgroups. Containers are isolated processes but fully transparent to the underlying host operating machine. This in contrary to virtual machines which are a total black box for the host machine. Containers reuse the host kernel api and are therefore more light weighted but also more limited then VM’s. Containers are exists already much longer then docker and you can create them easily yourself.