GitLab is a great tool to manage your repositories. Its not a replacement for tools like GIT or SourceTree but a nice addition to the total GIT workflow. Installing GitLab is easy, just follow the instruction on this page but configuring it so that you can push and pull from it can be more complicated. Especially if you want to change some if its default behaviour.
From here on I assume you have installed GitLab and its up and running. I installed GitLab on my Debian Virtual Machine that is running on my Windows server. Now the cool thing is that my repositories are located on a physical drive under windows. So the first thing I need to do is connect GitLab to my physical disk in Windows. I could of course choose to keep everything inside the virtual machine but I dont like the feeling to have my repositories in a VM even when I can mount it under windows.
Changing the default GitLab data location
First of all I use VirtualBox as virtualisation software. So the first thing I needed to do is create a shared folder under the settings of my VM:
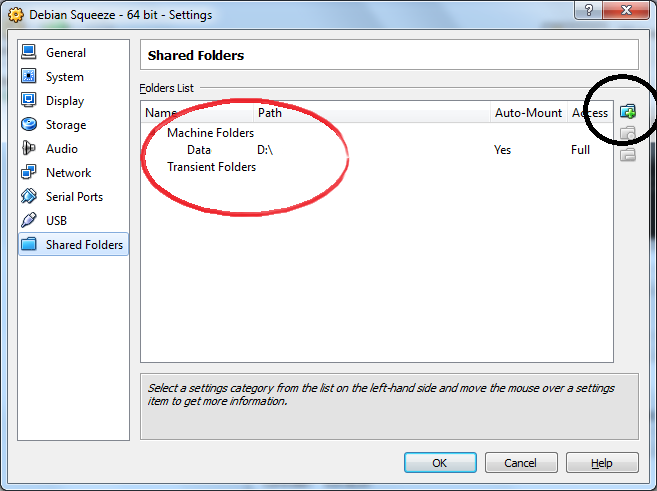
Share a host folder with a Virtual Machine
Next reboot your VM and then we need to mount this shared folder permanently. I dont have any existing repositories yet in GitLab configured so I dont have to bother about copying anything. If you do dont forget to move them also!
First create a mount point in /mnt. I call it data because I am going to share my data disk. But you can call it whatever you want.
|
1 2 |
> cd /mnt > mkdir data |
Now to mount a drive permanently you normally edit /etc/fstab but this doesn’t work in our case. Atleast its not really reliable because when the system is going to mount the drives the VirtualBox share is not always already available. This service normally starts after the mounting process. So instead of mounting it there we mount it in /etc/rc.local. This script is executed right after each boot but after all services have been loaded.
|
1 |
> vim /etc/rc.local |
Then put this line right before the exit 0
|
1 2 |
# Mount Shared folders from Windows mount -t vboxsf data /mnt/data |
Now we need to tell GitLab to use this new location. Open the file /etc/gitlab/gitlab.rband add the line:
|
1 |
ruby git_data_dir "/mnt/data" |
Save the file and now reboot your VM.
Adding your SSH public key to GitLab
To be able to communicate with GitLab I need to add my public SSH key to my profile in GitLab. But before I can do that I need to generate one. If you have already a public SSH key for your computer then you can use that one of course.
The instruction on GitLab to generate SSH keys only apply to Unix systems. I am working on a Windows machine so I need to to it a bit differently.
I recommand that you install git on your computer first. After installing git you have a nice ssh key generator that works under windows. Open the command-line and type in:
|
1 |
c:\>ssh-keygen -t rsa |
Answer the questions on the screen and put the keys in the default directory. I recommend to set a password on your key. Next go to your folder where the keys are saved and open with notepad id_rsa.pub file. Copy the entire content and now go to your profile in GitLab. Click on the tab SSH Keys and add your public key here.
That’s it. Now you should be able to clone the project using the link provided in GitLab.
Its important that the server where Gitlab is installed is listing on port 22 for an SSH connection. If you use a custom port you need some extra configuration, read this for more info. I recommend to use the default port because custom ports require you to configure some settings also on your local machine before you can clone.