In this post I take a look at what blob storage exactly is, why it could be interesting and how it works in EPiServer. By default EPiServer uses blob storage to store all its content. Further I take a look at how to access stored media assets from code and show them in a view and how to save an uploaded image as a blob in the Media panel.
BLOB (Binary Large Object) providers is a framework designed to store large amounts of binary data in a more optimized and cost-effective solution such as cloud storage, instead of in the database. The EPiServer platform supports BLOB storage of assets using a provider-based setup, and has a built-in file BLOB provider. By default this provider will store files on local disc or a file share which will be defined during installation. – EPiServer World
Advantages of blob storage are:
- Scalability
- Better performance
- Assets can be locked from outside manipulation (an image stored as a file on your system can be modified by other applications then you application without you knowing it)
So how does it work in EPiServer?
Attaching an existing Media file to a ContentReference property in your (View)Model by code.
First lets say you want to attach an existing Media file from the Media panel to a ViewModel ContentReference property and display it. Take a look at the Media panel from the Alloy MVC Sample page.
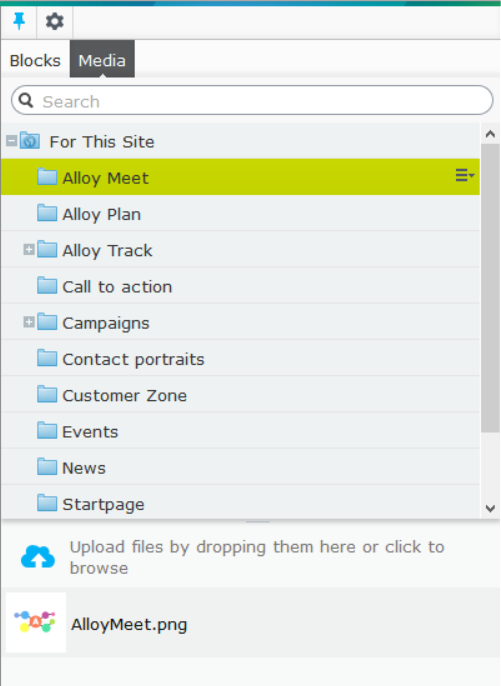
EPiServer Media Panel
Now ofcourse you can make a contentreference property on your startpage and let the editor attach this media file to that property using the CMS but what if we want to do this by code?

Dragging your mouse over an image shows its content ID
If you hover your mouse over the image you see its content ID which is 87 in this case.
Now add a simple property to your startpage type model (~/Models/Pages/StartPage.cs)
|
1 2 |
[Ignore] public ContentReference ImageAttachedByCode { get; set; } |
Next in your controller attach the image to this property:
|
1 |
model.CurrentPage.ImageAttachedByCode = new ContentReference(87); |
And in your view lets display it:
|
1 |
<img src="@Url.ContentUrl(Model.CurrentPage.ImageAttachedByCode)" /> |
@Url.ContentUrl can be used for all ContentReference, also PageReferences because they inherit from ContentReference to get a URL to that specific content.
How to loop through all available Media?
You could ask yourself now what if I dont know the ID and I dont want to find it first using the trick of going to the CMS, mouseover the item and check the ID. What if i want to do the searching for media also from code?
Looping through all assets is easy if you have a ContentReference. If you dont have one start from the GlobalAssetsRoot.
|
1 2 3 4 5 6 7 8 |
var contentRepository = ServiceLocator.Current.GetInstance<IContentRepository>(); var RootAssets = contentRepository.GetChildren<MediaData>(SiteDefinition.Current.GlobalAssetsRoot); foreach (var asset in RootAssets) { ContentReference currentAsset = asset.ContentLink; // Get other properties of this asset } |
This will not loop through all the subfolders in the Media Panel. For that you need to use GetChildren<ContentFolder>.
|
1 2 3 4 5 6 7 |
var contentRepository = ServiceLocator.Current.GetInstance<IContentRepository>(); var rootFolders = contentRepository.GetChildren<ContentFolder>(SiteDefinition.Current.GlobalAssetsRoot); foreach (var rootFolder in rootFolders) { // Do something } |
By combining these two loops you can find Media with a specific filename located in any of the subfolders and get its ContentReference. How cool is that!
Creating a new Image and saving it in the Media Panel
Next I am going to create a new image and save it in the Media Panel. Of course an Editor can also upload the image but I want to do it from code.
This is a really interesting post about working with Media on EPiServer World:
http://world.episerver.com/Documentation/Items/Developers-Guide/EPiServer-CMS/75/Content/Assets-and-media/Working-with-media/
Media (for example, files) are treated as any other content type but have an associated binary data. The binary data is stored using something called BLOB providers which are optimized for storing streams of data.
The code below is an example of how to save an image as a blob and make it available in the Media Panel under ‘For This Site’.
|
1 2 3 4 5 6 7 8 9 10 11 12 13 14 15 16 17 18 19 20 21 22 23 24 |
var contentRepository = ServiceLocator.Current.GetInstance<IContentRepository>(); var contentTypeRepository = ServiceLocator.Current.GetInstance<IContentTypeRepository>(); var mediaDataResolver = ServiceLocator.Current.GetInstance<ContentMediaResolver>(); var blobFactory = ServiceLocator.Current.GetInstance<BlobFactory>(); //Get a suitable MediaData type from extension var mediaType = mediaDataResolver.GetFirstMatching(".jpg"); var contentType = contentTypeRepository.Load(mediaType); //Get a new empty file data var media = contentRepository.GetDefault<MediaData>(SiteDefinition.Current.GlobalAssetsRoot, contentType.ID); media.Name = "SomeImage.jpg"; //Create a blob in the binary container var blob = blobFactory.CreateBlob(media.BinaryDataContainer, ".jpg"); using (var fs = new FileStream(@"C:\helene-fischer-echo2013.jpg", FileMode.Open)) { blob.Write(fs); } //Assign to file and publish changes media.BinaryData = blob; var file1ID = contentRepository.Save(media, SaveAction.Publish); |
Now lets say you want to put it in a different folder. For example put it in the subfolder ‘Startpage’. Lets adjust the code it bit and use what I described in the previous section for finding this folder.
First I created a method to find the ContentReference of a subfolder with a specific name:
|
1 2 3 4 5 6 7 8 9 10 11 12 |
public ContentReference FindMediaFolderByName(string name, ContentReference defaultFolder = null) { var contentRepository = ServiceLocator.Current.GetInstance<IContentRepository>(); var rootFolders = contentRepository.GetChildren<ContentFolder>(SiteDefinition.Current.GlobalAssetsRoot); foreach (var rootFolder in rootFolders) { if (rootFolder.Name == name) return rootFolder.ContentLink; } return defaultFolder; } |
Now we can use this to set the target folder:
|
1 2 |
//Get a new empty file data var media = contentRepository.GetDefault<MediaData>(FindMediaFolderByName("Startpage",SiteDefinition.Current.GlobalAssetsRoot), contentType.ID); |
That’s it. Now we can save an Image in any folder we like in the Media Panel.
Upload an File through a webform and save it in the Media Panel
First lets create a form that can be used to upload images (or text files or whatever you want).
|
1 2 3 4 5 |
@using (Html.BeginForm("uploadFile", null, FormMethod.Post, new { enctype = "multipart/form-data" })) { <input type="file" name="file"> <input type="submit" value="Upload Now"/> } |
In the controller lets create a method that catches this submission and saves the uploaded file in a folder.
|
1 2 3 4 5 6 7 8 9 10 11 12 13 14 15 16 17 18 19 20 21 22 23 24 25 26 27 28 29 30 |
public string uploadFile(StartPage currentPage, HttpPostedFileBase file) { var contentRepository = ServiceLocator.Current.GetInstance<IContentRepository>(); var contentTypeRepository = ServiceLocator.Current.GetInstance<IContentTypeRepository>(); var mediaDataResolver = ServiceLocator.Current.GetInstance<ContentMediaResolver>(); var blobFactory = ServiceLocator.Current.GetInstance<BlobFactory>(); //Get extension filename string FileExtension = Path.GetExtension(file.FileName); // ex. .jpg or .txt //Get a suitable MediaData type from extension var mediaType = mediaDataResolver.GetFirstMatching(FileExtension); var contentType = contentTypeRepository.Load(mediaType); //Get a new empty file data var media = contentRepository.GetDefault<MediaData>(this.FindMediaFolderByName("Startpage", SiteDefinition.Current.GlobalAssetsRoot), contentType.ID); media.Name = file.FileName; //Create a blob in the binary container var blob = blobFactory.CreateBlob(media.BinaryDataContainer, FileExtension); blob.Write(file.InputStream); //Assign to file and publish changes media.BinaryData = blob; var file1ID = contentRepository.Save(media, SaveAction.Publish); return "Upload completed"; } |
Remember I am testing this code in the Alloy MVC Sample that has an GenericMedia type. This Media Type accepts all file types and therefor the uploading works. Normally its not recommended to have such mediatype. Use attribute [MediaDescriptor(ExtensionString = “txt,zip,pdf”)] on a Media Type to specify exactly which filetypes are allowed.